Traditional chocolates
A demanding process
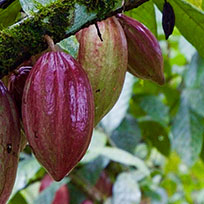
Plantation: Cocoa farm
2 Harvests / Year
First fruit production: 2 - 4 years
Perfect harvesting time: Ripe Fruit
500 beans = 1 Kilo of chocolate
It requires high rainfall, high temperatures, humidity and sufficient shade.
Water stress to the plant causes organoleptic defects in the cocoa.
The pods take 4 – 6 months to ripen and contain 30 to 40 beans.
The green fruit is not the optimum state of ripeness.
They are opened by hand with a sharp instrument.
The beans must not be damaged when opening, immediate transport to the collection point necessary.
The most critical point where quality is concerned.
The beans are stored in wooden crates and covered with plantain leaves to maintain heat. During this process, the embryo of the bean is eliminated and the flavours start to develop.
6 days fermentation.
Direct sunlight to assure optimum flavour. The beans are turned constantly to obtain uniform drying.
The beans are cleaned, separated from any foreign bodies and shelled.
This action develops the aromatic components and flavour of the cocoa. Roasting time is kept to a minimum to retain purity.
The cocoa is ground to separate the cocoa mass from its butter. This mass is called Cocoa liquor.
Cocoa butter makes up approximately half fo the weight of the cocoa bean.
This fat is partly extracted from the cocoa liquor by pressing.
The cocoa paste or cocoa liquor is used in the production of high quality chocolate by adding cocoa butter.
Vanilla and sugar are also added.
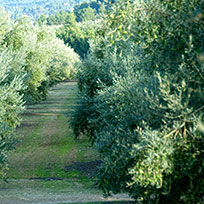
Plantation of olives: Olive grove
1 harvest/year
First production: 3 - 5 years
Harvesting: pre-ripening, fruit before ripening begins
10 Kilos olives = 1 litre of oil
It requires cold winters, Mediterranean summers and a lot of sun.
A small amount of controlled water stress is vital to boost organoleptic qualities.
Due to the microclimate of the estate, we have one of the latest flowering periods in Spain, occurring in June.
At the end of October, harvesting starts.
This phenomenon occurs in the middle of August and it is from this moment on that controlled water stress starts.
This stage is of critical importance for quality.
The ripeness of the fruit will mark the organoleptic profile of the future extra virgin olive oil.
We harvest when the majority of the fruit is green.
Transport to the oil mill is carried out with extreme care and in the shortest time possible.
The leaves and branches are removed using a process of air-blowing. After that, there is the option to wash the olives or not. We don’t.
A millstone slowly crushes the olives. In this way, all of the properties of the fruit are retained.
The olive paste obtained in the mill is beaten to facilitate the appearance of the oil.
The temperature in this process should not be higher than 23ºC so that the aromatic compounds aren’t lost and so that the oxidation process isn’t speeded up.
It separates the solid components from the liquid. Here, the oil is obtained and the stone, pulp etc are eliminated.
A stainless steel storage tank in the shape of an inverted cone to facilitate flushing.
Controlled at constant temperature and rendered inert with nitrogen.